Developer Guide
This developer guide includes complete instructions for setting up a developer environment.
Devcontainer
If you use VSCode a .devcontainer recipe is available that makes it easy to spin up an environment just by way of opening the repository in VSCode! After doing this, continue to Local below.
Docker
You can use the demo container, either as provided or build on your own, to run the server and interact with it. To optionally build the container:
$ docker build -t ghcr.io/flux-framework/flux-restful-api .
To build ensuring there is authentication (this will use user and token defaults)
$ docker build --build-arg use_auth=true -t ghcr.io/flux-framework/flux-restful-api .
Or define extra builds args --build-arg user=fluxuser --build-arg token=12345 to customize the username and token!
Build arguments supported are:
| Name | Description | Default |
|---|---|---|
| user | Username for basic auth | unset |
| token | Token password for basic auth | unset |
| use_auth | Turn on authentication | unset (meaning false) |
| port | Port to run service on (and expose) | 5000 |
| host | Host to run service on (you probably shouldn't change this) | 0.0.0.0 |
| workers | Number of workers to run uvicorn with (required for Flux jobs with >1 process) | 1 |
And run it ensuring you expose port 5000. The container should show you if you’ve correctly provided auth (or not):
$ docker run --rm -it -p 5000:5000 ghcr.io/flux-framework/flux-restful-api
🍓 Require auth: True
🍓  Server mode: single-user
🍓   Secret key ***********
🍓    Flux user: ********
🍓   Flux token: *****
collected 5 items
INFO:     Started server process [72]
INFO:     Waiting for application startup.
INFO:     Application startup complete.
INFO:     Uvicorn running on http://0.0.0.0:5000 (Press CTRL+C to quit)
Or run detached and then stop later:
$ docker run --name flux-restful -d --rm -it -p 5000:5000 ghcr.io/flux-framework/flux-restful-api
$ docker stop flux-restful
To try a branch of the RESTful API, build the image from your checkout and run that instead (this is also what CI does for the client tests):
$ docker build -t flux-restful-api:dev .
$ docker run --name flux-restful -d --rm -it -p 5000:5000 flux-restful-api:dev
Local
You can use this setup locally (if you have flux and Python available) or within the Dev Container in a VSCode environment.
1. Install
The server is on PyPI as flux-restful. You also need the Flux Python bindings (import flux),
which come with Flux itself and are not on PyPI, so use a virtual environment that can see them:
$ python -m venv --system-site-packages env
$ source env/bin/activate
$ pip install flux-restful
To work on the code, install the checkout instead (the pins in requirements.txt are the
versions the container image is tested with):
$ pip install -r requirements.txt -r .github/dev-requirements.txt
$ pip install --no-deps -e .
Either way you get the flux-restful command, with serve, init, add-user, and list-users.
2. Start Service
There are two ways to start the app! You can either have it be the entry for flux start:
$ flux start flux-restful serve --host=0.0.0.0 --port=5000
Or do it separately (two commands):
flux start --test-size=4
flux-restful serve --host=0.0.0.0 --port=5000
flux-restful serve runs uvicorn; --workers adds workers, which all need the same
FLUX_TOKEN_SIGNING_KEY. For auto-reload during development run uvicorn directly:
uvicorn flux_restful.main:app --reload.
For the latter, you can also use the Makefile:
$ make
If you are developing, you must do the second approach as the server won’t live-update with the first. If you want to start flux running as a separate process:
sudo -u flux /usr/bin/flux broker \
  --config-path=/etc/flux/system/conf.d \
  -Scron.directory=/etc/flux/system/cron.d \
  -Srundir=/run/flux \
  -Sstatedir=${STATE_DIRECTORY:-/var/lib/flux} \
  -Slocal-uri=local:///run/flux/local \
  -Slog-stderr-level=6 \
  -Slog-stderr-mode=local \
  -Sbroker.rc2_none \
  -Sbroker.quorum=0 \
  -Sbroker.quorum-timeout=none \
  -Sbroker.exit-norestart=42 \
  -Scontent.restore=auto &
And then we need munge to be started (this should be done by the devcontainer):
$ sudo service munge start
And export any authentication envars you need before running make.
export FLUX_URI=local:///run/flux/local
$ sudo -E make
3. Authentication
Authentication is off by default (FLUX_AUTH_BACKEND=none). To require it, choose a backend
and provide what it needs. For database users, which is what the Python client and the Flux
Operator use, export the superuser credentials and the keys, then initialize the database:
export FLUX_AUTH_BACKEND=shared-secret
export FLUX_USER=$USER
export FLUX_TOKEN=123456
export FLUX_SECRET_KEY=$(openssl rand -hex 32)
export FLUX_TOKEN_SIGNING_KEY=$(openssl rand -hex 32)
make init
FLUX_REQUIRE_AUTH=true is still accepted and means the same as FLUX_AUTH_BACKEND=shared-secret.
To authenticate against system accounts instead, install python-pam and use the pam backend.
PAM can only check other users’ passwords when the server runs as root. Superusers are listed
explicitly:
export FLUX_AUTH_BACKEND=pam
export FLUX_ADMIN_USERS=$USER
For multi-user mode (FLUX_SERVER_MODE=multi-user) jobs run as the authenticated system
user. The Flux instance is started first as the flux user with guest access and flux-imp
configured (see example/multi-user),
with allow-root-owner = true, which lets the root server act as the instance owner (read any
jobspec, cancel any job), and the server is started by root: for each submission it becomes the user, whose own
flux python signs and submits the jobspec, so no sudoers rules are needed. The server
refuses to start in multi-user mode as any other user. PAM is the natural backend here,
because every authenticated name is a system account; database works too if the database
usernames match system accounts.
Ownership is enforced for a job’s details, output, and cancellation: in multi-user mode a job belongs to the uid it runs as, and in single-user mode (where every job runs as the server user) to the API user who submitted it, recorded in the jobspec. Superusers may act on any job. In single-user mode the job listing is shared.
To accept tokens issued by an OpenID Connect provider:
export FLUX_AUTH_BACKEND=oidc
export FLUX_OIDC_ISSUER=https://accounts.example.com
export FLUX_OIDC_AUDIENCE=my-client-id
The username is the token’s sub claim, the only claim OIDC guarantees to be stable and
unique, so FLUX_ADMIN_USERS should list subjects. Claims such as preferred_username or
email can be chosen with FLUX_OIDC_USERNAME_CLAIM, but only if your provider guarantees
they are unique and not user-editable. In multi-user mode, where the username is the system
account jobs run as, that variable must be set to a claim that maps to local accounts, and
accounts below FLUX_MIN_UID (root, daemons) are refused whatever the claim says.
See the User Guide for how clients log in with each backend, and the environment table below for every variable.
Interactions
Regardless of how you install, you can open your host to http://127.0.0.1:5000 to see the very simple interface! This currently has API documentation (openapi) and we will soon add a table of jobs.
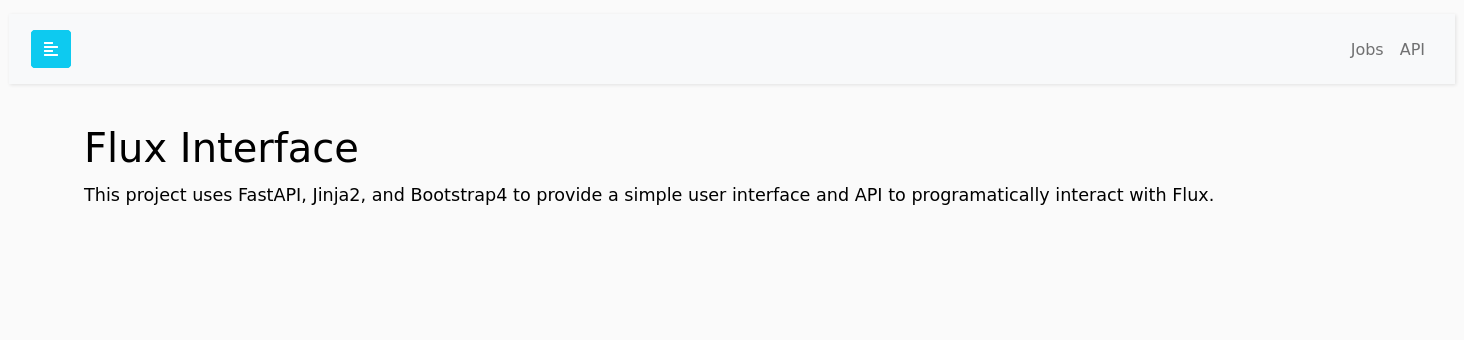
Once you have the server running, you can use an example client to interact with the server. See our User Guide for these instructions.
Environment
Wherever you run the app, you can control variables (settings) via the environment. The following variables are available (with their defaults):
| Name | Description | Default |
|---|---|---|
| FLUX_AUTH_BACKEND | Authentication backend: none, database, shared-secret, pam, or oidc |
none |
| FLUX_REQUIRE_AUTH | Deprecated: true is the same as FLUX_AUTH_BACKEND=shared-secret |
unset |
| FLUX_USER | Username of the database superuser created by init_db.py init |
fluxuser |
| FLUX_TOKEN | Password of the database superuser created by init_db.py init |
unset |
| FLUX_ADMIN_USERS | Comma separated usernames that are superusers with any backend | unset |
| FLUX_TOKEN_SIGNING_KEY | Server-only key that signs access tokens; required for backends that issue tokens and shared by all workers | unset (entrypoint.sh generates one per container start) |
| FLUX_PAM_SERVICE | PAM service name for the pam backend |
login |
| FLUX_MIN_UID | Lowest uid a backend may map a login to (pam, and oidc in multi-user mode); root and daemons are refused |
1000 |
| FLUX_OIDC_ISSUER | OpenID Connect issuer URL (oidc backend, required) |
unset |
| FLUX_OIDC_AUDIENCE | Expected token audience, usually the client id (oidc backend, required) |
unset |
| FLUX_OIDC_JWKS_URL | JWKS URL, if it cannot be discovered from the issuer | discovered |
| FLUX_OIDC_USERNAME_CLAIM | Token claim used as the username (oidc backend); required in multi-user mode |
sub |
| FLUX_HAS_GPU | GPUs are available for the user to request | unset |
| FLUX_NUMBER_NODES | The number of nodes available (exposed) in the cluster | 1 |
| FLUX_OPTION_FLAGS | Option flags to give to flux, in the same format you'd give on the command line | unset |
| FLUX_JOB_ENV_PASSTHROUGH | Extra server environment variables (comma separated names or patterns, e.g. CUDA_*,OMP_NUM_THREADS) to pass to jobs and launchers |
unset |
| FLUX_SECRET_KEY | Secret shared with clients to encode the /v1/token handshake (required for shared-secret) |
unset |
| FLUX_ACCESS_TOKEN_EXPIRES_MINUTES | number of minutes to expire an access token | 600 |
| FLUX_RESTFUL_HOST | Host for command line client | http://127.0.0.1:5000 |
Job Environment
Jobs do not inherit the server’s environment. They get a fixed allowlist (PATH, HOME, locale
variables, PYTHONPATH, LD_LIBRARY_PATH, and the Flux paths exported by flux start) plus any
variables in the submit request, and the job shell provides FLUX_URI and the FLUX_JOB_* variables
itself. This keeps server settings and secrets such as FLUX_TOKEN out of jobs. If your deployment
relies on other variables reaching jobs, for example CUDA_, OMP_, or a CONDA or SPACK
environment, list them in FLUX_JOB_ENV_PASSTHROUGH:
export FLUX_JOB_ENV_PASSTHROUGH="CUDA_*,OMP_NUM_THREADS,CONDA_PREFIX"
Launchers (nextflow, snakemake) run on the server rather than inside a job, so they get the same allowlist plus FLUX_URI in order to submit their jobs to this instance.
Flux Option Flags
Option flags can be set server-wide or on the fly by a user in the interface (or restful API). An option set by a user will over-ride the server setting. An example setting a server-level option flags is below:
export FLUX_OPTION_FLAGS="-ompi=openmpi@5"
This would be translated to:
fluxjob = flux.job.JobspecV1.from_command(command, **kwargs)
fluxjob.setattr_shell_option("mpi", "openmpi@5")
And note that you can easily set more than one:
export FLUX_OPTION_FLAGS="-ompi=openmpi@5 -okey=value"
Code Linting
We use pre-commit to handle code linting and formatting, including:
black
isort
flake8
Our setup also handles line endings and ensuring that you don’t add large files!
Using the tools is easy. After preparing your local environment, you can use pre-commit as follows. Here is a manual run:
$ pre-commit run --all-files
check for added large files..............................................Passed
check for case conflicts.................................................Passed
check docstring is first.................................................Passed
fix end of files.........................................................Passed
trim trailing whitespace.................................................Passed
mixed line ending........................................................Passed
black....................................................................Passed
isort....................................................................Passed
flake8...................................................................Passed
And to install as a hook (recommended so you never commit with linting flaws!)
$ pre-commit install
Database
The server keeps its users in a SQLite database, flux-restful.db in the working directory.
flux-restful init creates the tables (if missing) and the superuser from FLUX_USER and
FLUX_TOKEN:
export FLUX_USER=fluxuser
export FLUX_TOKEN=12345
$ flux-restful init
INFO:flux-restful:Creating initial data
INFO:flux-restful:User fluxuser has been created.
INFO:flux-restful:Initial data created
The container entrypoint does the same at every start, since its database is ephemeral.
Alembic is configured (alembic.ini, flux_restful/migrations) for schema migrations if the
models change in a release; it is not needed to run the server.
or add a user:
$ flux-restful add-user peenut peenut
INFO:flux-restful:User peenut has been created.
You can see how we run these commands in the entrypoint.sh for the container.
The database is always created fresh, and the flux user and token (superuser)
are always generated from the environment variables shown above.
Documentation
The documentation is provided in the docs folder of the repository,
and generally most content that you might want to add is under
getting_started. For ease of contribution, files that are likely to be
updated by contributors (e.g., mostly everything but the module generated files)
are written in markdown. If you need to use toctree you should not use extra newlines or spaces (see index.md files for examples). The documentation is also provided in Markdown (instead of rst or restructured syntax)
to make contribution easier for the community.
Finally, we recommend you use the same development environment also to build and work on documentation. The reason is because we import the app to derive docstrings, and this will require having Flux.
NOTE to build the documentation you will need an unauthenticated flux endpoint running. E.g., in another terminal:
$ flux start uvicorn flux_restful.main:app --host=0.0.0.0 --port=5000
Install Dependencies and Build
The documentation is built using sphinx, and generally you can install dependencies (done in devcontainer):
cd docs
pip install -r requirements.txt

# Ensure auth is off
unset FLUX_REQUIRE_AUTH

# And build the docs into _build/html
make html
Preview Documentation
After make html you can enter into _build/html and start a local web
server to preview:
$ python -m http.server 9999
And open your browser to localhost:9999
Run Tests
To run tests, from within the devcontainers environment (or with a local install) of Flux alongside the app) you can use flux start. You will need to run them as the flux instance owner. E.g., if it’s flux:
$ sudo -u flux flux start pytest -xs tests/
or if it’s just root / a single user:
$ flux start pytest -xs tests/test_api.py
Docstrings
To render our Python API into the docs, we keep an updated restructured
syntax in the docs/source folder that you can update on demand as
follows:
$ ./apidoc.sh
This should only be required if you change any docstrings or add/remove functions from oras-py source code.