Lammps on Google Cloud
This basic tutorial will walk through creating a MiniCluster to run LAMMPS! You should have already setup your workspace
Note this has not been tested with the Version 2 Flux Operator.
Create Cluster
Let’s use gcloud to create a cluster, and we are purposefully going to choose a very small node type to test. Note that I choose us-central1-a because it tends to be cheaper (and closer to me). First, here is our project for easy access:
GOOGLE_PROJECT=myproject
Then create your cluster as follows:
$ gcloud container clusters create flux-cluster --project $GOOGLE_PROJECT \
    --zone us-central1-a --machine-type n1-standard-1 \
    --num-nodes=4 --enable-network-policy --tags=flux-cluster --enable-intra-node-visibility
As an example to use core-dns:
$ gcloud container clusters create flux-operator --cluster-dns=clouddns \
    --cluster-dns-scope=cluster --region=us-central1-a --project $GOOGLE_PROJECT \
    --machine-type n1-standard-2 --num-nodes=4 --enable-network-policy --tags=flux-cluster --enable-intra-node-visibility
If you need a particular Kubernetes version:
$ gcloud container clusters create flux-cluster --project $GOOGLE_PROJECT \
    --zone us-central1-a --cluster-version 1.23 --machine-type n1-standard-1 \
    --num-nodes=4 --enable-network-policy --tags=flux-cluster --enable-intra-node-visibility
Note that not all of the flags above might be necessary - I did a lot of testing to get this working and didn’t go back and try removing things after the fact! If you want to use cloud dns instead (after enabling it)
$ gcloud beta container clusters create flux-cluster --project $GOOGLE_PROJECT \
    --zone us-central1-a --cluster-version 1.23 --machine-type n1-standard-1 \
    --num-nodes=4 --enable-network-policy --tags=flux-cluster --enable-intra-node-visibility \
    --cluster-dns=clouddns \
    --cluster-dns-scope=cluster
In your Google cloud interface, you should be able to see the cluster! Note this might take a few minutes.

I also chose a tiny size (nodes and instances) anticipating having it up longer to figure things out.
Get Credentials
Next we need to ensure that we can issue commands to our cluster with kubectl. To get credentials, in the view shown above, select the cluster and click “connect.” Doing so will show you the correct statement to run to configure command-line access, which probably looks something like this:
$ gcloud container clusters get-credentials flux-cluster --zone us-central1-a --project $GOOGLE_PROJECT
Fetching cluster endpoint and auth data.
kubeconfig entry generated for flux-cluster.
Finally, use cloud IAM to ensure you can create roles, etc.
$ kubectl create clusterrolebinding cluster-admin-binding --clusterrole cluster-admin --user $(gcloud config get-value core/account)
clusterrolebinding.rbac.authorization.k8s.io/cluster-admin-binding created
At this point you should be able to get your nodes:
$ kubectl get nodes
NAME                                            STATUS   ROLES    AGE     VERSION
gke-flux-cluster-default-pool-f103d9d8-379m   Ready    <none>   3m41s   v1.23.14-gke.1800
gke-flux-cluster-default-pool-f103d9d8-3wf9   Ready    <none>   3m42s   v1.23.14-gke.1800
gke-flux-cluster-default-pool-f103d9d8-c174   Ready    <none>   3m42s   v1.23.14-gke.1800
gke-flux-cluster-default-pool-f103d9d8-zz1q   Ready    <none>   3m42s   v1.23.14-gke.1800
Deploy Operator
To deploy the Flux Operator, choose one of the options here to deploy the operator. Whether you apply a yaml file, use flux-cloud or clone the repository and make deploy you will see the operator install to the operator-system namespace.
For a quick “production deploy” from development, the Makefile has a directive that will build and push a test tag (you’ll need to edit DEVIMG to be one you can push to) and then generate a
yaml file targeting that image, e.g.,
$ make test-deploy
$ kubectl apply -f examples/dist/flux-operator-dev.yaml
or the production version:
$ kubectl apply -f examples/dist/flux-operator.yaml
...
clusterrole.rbac.authorization.k8s.io/operator-manager-role created
clusterrole.rbac.authorization.k8s.io/operator-metrics-reader created
clusterrole.rbac.authorization.k8s.io/operator-proxy-role created
rolebinding.rbac.authorization.k8s.io/operator-leader-election-rolebinding created
clusterrolebinding.rbac.authorization.k8s.io/operator-manager-rolebinding created
clusterrolebinding.rbac.authorization.k8s.io/operator-proxy-rolebinding created
configmap/operator-manager-config created
service/operator-controller-manager-metrics-service created
deployment.apps/operator-controller-manager created
Ensure the operator-system namespace was created:
$ kubectl get namespace
NAME              STATUS   AGE
default           Active   6m39s
kube-node-lease   Active   6m42s
kube-public       Active   6m42s
kube-system       Active   6m42s
operator-system   Active   39s
$ kubectl describe namespace operator-system
Name:         operator-system
Labels:       control-plane=controller-manager
              kubernetes.io/metadata.name=operator-system
Annotations:  <none>
Status:       Active

Resource Quotas
  Name:                              gke-resource-quotas
  Resource                           Used  Hard
  --------                           ---   ---
  count/ingresses.extensions         0     100
  count/ingresses.networking.k8s.io  0     100
  count/jobs.batch                   0     5k
  pods                               1     1500
  services                           1     500

No LimitRange resource.
And you can find the name of the operator pod as follows:
$ kubectl get pod --all-namespaces
      <none>
operator-system   operator-controller-manager-56b5bcf9fd-m8wg4               2/2     Running   0          73s
Now let’s run a short experiment with LAMMPS!
Custom Resource Definition
The Custom Resource Definition (CRD) defines our MiniCluster, and is what we hand to the flux operator to create it. Here is the CRD for a small lammps run.
apiVersion: flux-framework.org/v1alpha2
kind: MiniCluster
metadata:
  name: flux-sample
spec:
  size: 4
  logging:
    quiet: true
  containers:
    - image: ghcr.io/converged-computing/metric-lammps:latest
      workingDir: /opt/lammps/examples/reaxff/HNS
      command: lmp -v x 2 -v y 2 -v z 2 -in in.reaxc.hns -nocite
Create the Lammps Job
Now let’s apply the custom resource definition to create the lammps MiniCluster! The file we generated above should be in your present working directory.
$ kubectl apply -f minicluster.yaml
There are different ways to see logs for pods. First, see pods running and state.
You probably want to wait until the state changes to Running
because this is where we are pulling the chonker containers.
$ kubectl get -n flux-operator pods
If you need to debug (or see general output for a pod about creation) you can do:
$ kubectl describe pods flux-sample-0-742bm
And finally, the most meaty piece of metadata is the log for the pod, where the Flux Operator will be setting things up and starting flux.
# Add the -f to keep it hanging
$ kubectl  logs flux-sample-0-742bm -f
To get logs for the operator itself:
$ kubectl logs -n operator-system operator-controller-manager-56b5bcf9fd-j2g75
And when you are done:
$ kubectl delete -f minicluster.yaml
and wait until the pods are gone.
$ kubectl get pods
No resources found in flux-operator namespace.
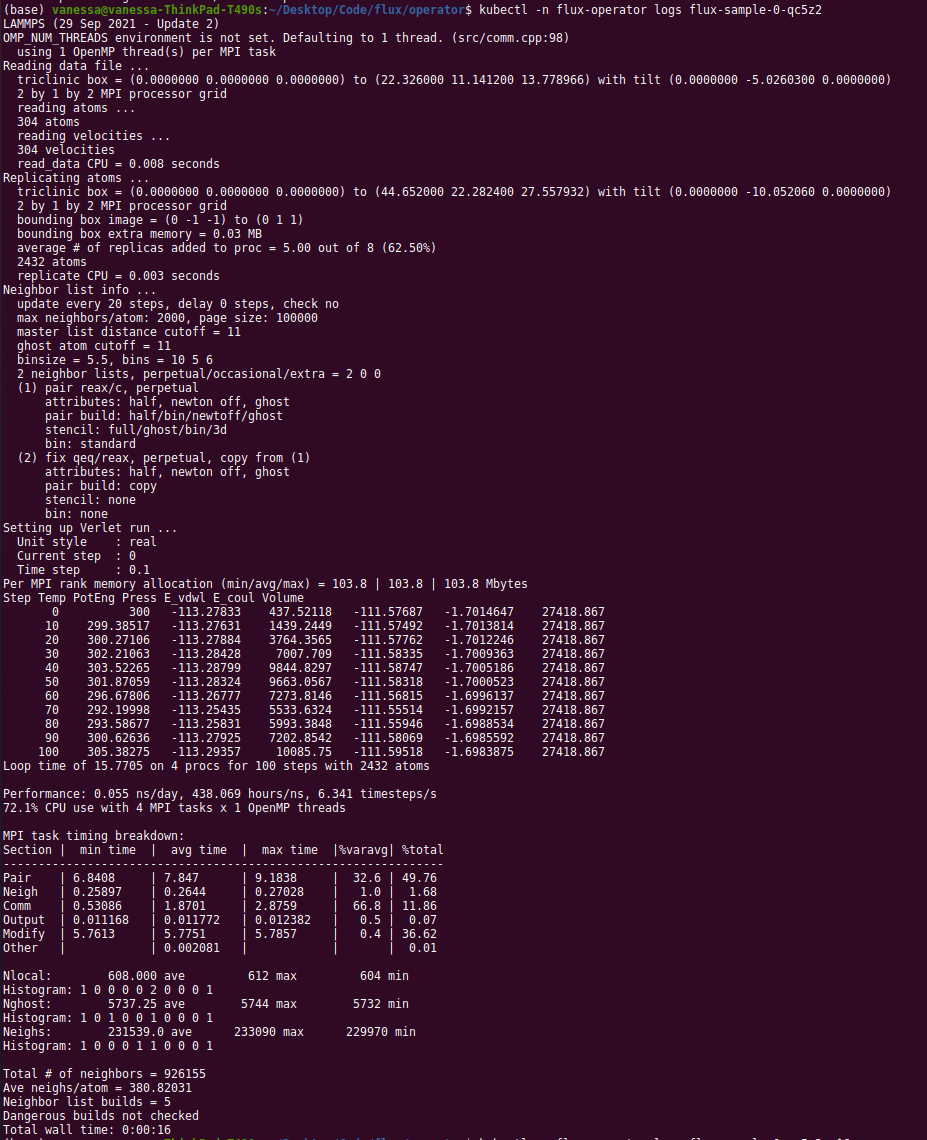
For fun, here is the first successful run of Lammps using the Flux Operator on GCP ever!
Clean up
Whatever tutorial you choose, don’t forget to clean up at the end! You can optionally undeploy the operator (this is again at the root of the operator repository clone)
$ make undeploy
Or the file you used to deploy it:
$ kubectl delete -f examples/dist/flux-operator.yaml
$ kubectl delete -f examples/dist/flux-operator-dev.yaml
And then to delete the cluster with gcloud:
$ gcloud container clusters delete --zone us-central1-a flux-cluster
I like to check in the cloud console to ensure that it was actually deleted.
Customization and Debugging
Firewall
When I first created my cluster, the nodes could not see one another. I added a few flags for networking, and looked at firewalls as follows:
$ gcloud container clusters describe flux-cluster --zone us-central1-a | grep clusterIpv4Cidr
I didn’t ultimately change anything, but I found this useful.